
Capture One, Cultural Heritage
DT CropControl

Oct
Crop in Capture One can be manipulated in a variety of native ways.
- New: Click-Drag with the crop cursor to start a new crop
- Force New: Shift Click-Drag with the crop cursor to start a new crop
- Numerical: Type in a specific value for width or height; crop resizes based on current center point
- Preset: Apply a preset crop size
Capture One CH provides several additional ways to manipulate the crop:
- AutoCrop: Finds the subject matter and crops (with optional positive or negative padding)
- Modify Crop: Changes the crop of one or more selected images in numerical ways (e.g. make 100 pixels wider).
In this article we look at a non-native cropping tool that DT has developed under the name DT CropControl and released as open source (meaning you can use the code for free, with the only requirement that you must provide us credit and a link to this blog post if/when you post about or distribute the tool).
The tool is based on the Capture One AppleScript Dictionary and is, therefore, Mac only.
DT Building Blocks: AppleScripts
If you’re interested in AppleScripting for Capture One, we have a new product you’ll LOVE! DT Building Blocks – a library of super valuable ActionScripts custom built by Digital Transitions to help speed up and enhance your Capture One Workflow.

Simple AppleScript Cropping Example
The End Goal
We want to be able to modify the crop from the keyboard in a variety of ways (e.g. decrease the height, or nudge it to the left) with a single keystroke, making it faster to use than the native Capture One Crop tool (e.g. clicking and dragging).
A Humble Beginning
The journey of pages of code begins with the first few lines. Let’s start with a very simple example of changing the crop using AppleScript. In subsequent examples we’ll expand this code incrementally until we have turned our keyboard into Master of the Cropping Universe.
To run the below code copy/paste it into AppleScript Editor (the free app already loaded in your applications/utilties folder) or the very powerful Script Debugger app ($100 and worth every dime if you do any meaningful amount of scripting). Then launch Capture One, select an image, and push play on the AppleScript Editor screen. Note: if you’ve renamed the application “Capture One” then AppleScript, when you go to run the script, will ask you to select the application you meant, and will rewrite the first line of code accordingly.
When the script runs the height of the crop on the selected image will be changed to 500 pixels.
tell the application "Capture One"
   tell the primary variant
     set the crop height to 500
   end tell
end tell
Let’s parse the above code.
tell the application "Capture One"
In AppleScript some commands are executed by AppleScript itself. For example when you want to display a message to the user that is done through AppleScript itself. But the real power of AppleScript is that you can tell other programs to do something. Here we want to tell Capture One to change the current crop, so we indicate that with the line [tell the application “Capture One”] which indicates the commands that follow should be told to Capture One.
The last line of the script “end tell” indicates we are done telling things Capture One. The stuff between an opening “tell” command and a closing “end tell” is called a “Tell Block”. As you’ll see in the next line Tell Blocks can be nested inside of each other.
tell the primary variant
The second line is also the start of a Tell Block and is specific to Capture One’s dictionary of commands. Using AppleScript we can set the crop of any variant of any image in Capture One. We can’t just write [tell the application “Capture One” / set the crop height to 500] because Capture One won’t know which variant/image we want to change the crop of.
As a result of this line the next command will be told to the primary selected variant.
set the crop height to 500
This is specific to Capture One’s dictionary of commands. It does as-advertised. The height of the crop of whatever variant(s) we’re talking to is set to 500.
Just a Bit Further
Let’s extend the previous example a bit:
tell application "Capture One 10.2 CH"
   tell primary variant
      set desiredCropHeight to (crop height - 100)
      set crop height to desiredCropHeight
   end tell
end tell
Parsing this code reveals these differences:
set desiredCropHeight to (crop height - 100)
set crop height to desiredCropHeight
Here we set the height of the crop. In the previous example we set it to a fixed/absolute/specific height of 500 pixels. Here we set it to be 100 pixels shorter than originalCropHeight set in the line above.
If the crop starts off 1000 pixels high then this example code will reduce the height by 100 pixels. If run three times it will reduce the height by 300 pixels total.
If you’re feeling especially KonMarian these two set commands could be condensed into one:
set crop height to (crop height - 100)
In some cases splitting up such operations into different lines as we have done here can make the code easier to read, though that’s not necessarily the case here since all we’re doing is subtracting 100 pixels.
At the end of this example we haven’t created anything of actual practical use. Don’t worry. We’re getting there. But first…
Notes Before Things Get Harder
Indentation and Formatting
You’ll notice in the sample code above that we’ve indented stuff that falls inside a Tell Block. This helps with readability. When you paste the sample code into AppleScript it should get automatically indented. AppleScript Editor will also automatically color-notate the code to show what’s what. For example variables and subroutine names get colored green.
“The”
AppleScript is meant to be a “natural programming language.” Make no mistake, it’s still programming, which means you’re going to spend most of your time debugging silly mistakes, and googling for someone who has experienced a particular error and hopefully posted the cause and solution (or not). But because it is a “natural programming language” the commands and syntax are meant to be readable and approachable to non programmers (or at least to novice programmers). In the above example I included the word “the” in several places that don’t require it; AppleScript simply ignores it. For the rest of this article we’ll omit “the”
Variants, Selections, and Images – O My!
In Capture One there can be more than one version of a particular raw file. For example a single raw file 00001.IIQ could have one variant that is uncropped and in color and another variant which is cropped to a square and converted to black and white. Only one raw file sits on the hard drive; the two variants are a sort of virtual copy showing how that raw file looks with a particular set of adjustments.
Because of this there is some confusing terminology involved in what a particular picture/thumbnail is.
- Image: the raw file on the hard drive. You don’t see images in Capture One, but of course for any given variant there is a “parent” image.
- Variant: an image interpreted through a given set of adjustments. By default any given image only has one variant. Additional variants can be created for an image using the New Variant or Copy Variant commands.
- Selected Variants: the AppleScript term for all variants that are currently selected by the user.
- Primary Variant: the AppleScript term for the primary selected variant. In Capture One this is the variant with the thicker white border.
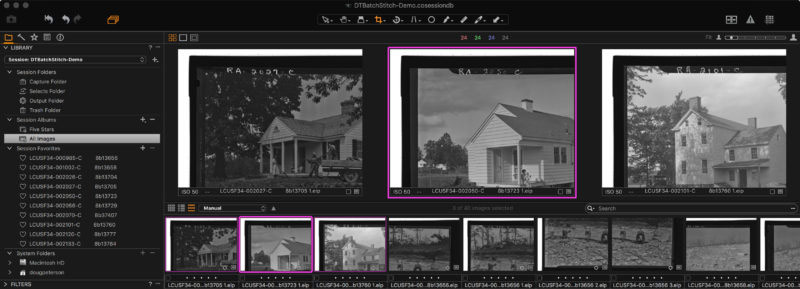
Note that [Primary Variant] and [First Variant in Selected Variants] are not synonyms. If the user selects three variants and then clicks on the second variant then that second variant will be the [Primary Variant] while the first variant would remain the [First Variant in Selected Variants]. See the screen grab below for an example of this.
Why Stop At One (Variant)?
Let’s resume our example now, but extend it to modify the first and second selected variants.
tell application "Capture One 10.2 CH"
   set currentSelection to selected variants

   -- first selected variant
   tell first item of currentSelection
      set desiredCropHeight to (crop height - 100)
      set crop height to desiredCropHeight
   end tell

   -- second selected variant
   tell second item of currentSelection
      set desiredCropHeight to (crop height - 100)
      set crop height to desiredCropHeight
   end tell
end tell
We’ve introduced four changes:
-- first selected variant
Anything after a double dash (“–“) is ignored by AppleScript. This is what is known as a “comment line”; every modern programming language has them (thought often with some other characters indicating the start of a comment rather than “–“). Comment lines are a way to write a note to your future self (or anyone else who might work with your code). Here the note is probably unnecessary because the code itself is pretty easy to understand, and is included here to introduce the concept of comment lines, as much as anything else.
set currentSelection to selected variants
Here we create a variable to store the list of all selected variants. We need to do this because “selected variants” can’t be used in all the places you’d want to use it. “Lists” are a specific kind of variable in AppleScript (and in many other programming languages) and different commands can be used to access either the entire list, or a specific item in the list.
tell first item of currentSelection
Instead of addressing the primary variant (a la “tell the primary variant” from the previous example) we will be addressing the first of the selected variants. This could also be written “tell item 1 of currentSelection”.
tell second item of currentSelection
Here we do the same thing, but with the second of the selected variants.
To run this example code you’ll need to have two variants selected. If you only select one variant and run the code you’ll get an error that starts with “Can’t get item 2” because you’re asking the script to (tell Capture One to) do something on the second selected variant, which doesn’t exist if you only have one variant selected.
To extend this example to change the crop of several variants would be annoying to say the least. You’d need one tell block for each variant, and if you had one tell block to many you’d get an error (e.g. if you had 30 tell blocks, but only 29 variants selected).
Instead we’ll extend the example to use a Repeat With loop, so that the “set crop height” command is issued once for each variant that is selected.
Repeat Repeat Repeat Repeat
The Repeat command does what it sounds like it does. Its most basic use looks like this:
Repeat 5
   beep
End Repeat
This example will beep 5 times (make sure your speakers are on). Notice that the Repeat / End Repeat is a block just like the Tell Block. Everything inside that block is repeated.
There is another way to use the Repeat command, and that is to have it repeat once for each item in a list.
Let’s extend our Crop Shortener Example using this method:
tell application "Capture One 10.2 CH"
   set currentSelection to selected variants
   repeat with theVariant in currentSelection
      tell theVariant
         set desiredCropHeight to (crop height - 100)
         set crop height to desiredCropHeight
      end tell
   end repeat
end tell
The first thing you should notice is that there is less total code. Instead of telling Capture One to “Crop the First Variant, then Crop the Second Variant” we’ve told it “Crop Each Selected Variant”
repeat with theVariant in currentSelection
This is a special use of the Repeat command. It will loop once for each item in [currentSelection]. Each time it loops it will assign the variable theVariant to the relevant item in the list. Say there are five variants selected. The first time through the loop theVariant will be set to the first selected variant. The second time through the loop theVariant will be set to the second selected variant. This will continue until every selected variant has had its turn to be theVariant.
tell theVariant
This is replacing “tell the second item of currentSelection.” We no longer need to (on this line) indicate which variant we are talking to; that has been taken care of the Repeat With loop.
Note that if no variants are selected the entire Repeat block will be skipped and no error will be thrown.
HC SVNT DRACONES
World’s End
A Capture One crop is not allowed to extend beyond the edge of the variant*. Weird things happen when you try. It’s like sailing to the end of the world; there be dragons.
Say we start with an image from the IQ3 100mp. That back produced raws that are 11,608 pixels wide. Assume we start with a variant that has been cropped to 10,000 pixels wide and use AppleScript to tell Capture One to expand the Crop Width by 2,000 pixels. Ideally what you would hope would happen would be one of the following:
- The crop is expanded to 11,608. In other words it goes as far as it can and then stops.
- Nothing happens. The Bartleby, the Scrivener approach.
- Some sort of error message. Thus allowing a careful programmer to catch the error.
What actually happens is none of these. Instead Capture One will change the OTHER dimension of the crop. The reason for this is arcane, but the upshot is pretty simple. If you write AppleScript to manipulate Capture One Crops you’ll have to add some code after the crop to see if the crop worked as desired or was not possible and therefore needs to be undone.
A simple version of such a set-check-undo code would be
tell application "Capture One 10.2 CH"
   set currentSelection to selected variants
   repeat with theVariant in currentSelection
      tell theVariant
         set originalCrop to crop
         set desiredCropHeight to (crop height - 100)
         set crop height to desiredCropHeight
         if crop height is not equal to desiredCropHeight
           set crop to originalCrop
         end if
      end tell
   end repeat
end tell
Let’s look more closely:
set originalCrop to crop
Here we store the crop to a variable we’ve named originalCrop. This way if we determine (in later code) that things have gone sideways we know the precise crop to return the variant to. We know how to “undo” a wayward crop.
set crop height to desiredCropHeight
if crop height is not equal to desiredCropHeight
This is one of those cases that “shouldn’t” happen right? We set A to be equal to B, and then say “if A and B are not equal.” Well, as discussed, this can happen if it’s not possible for Capture One to set the crop to the desiredCropHeight, namely if the crop would be larger than the image*.
Here we also introduce the concept of an IF block. Like the Repeat Block and Tell Block stuff goes inside of it (and gets indented for readability). As the name implies, the stuff inside an IF block only get executed IF the condition is true.
If (You're Happy) AND (You Know It)
  Clap Your Hands
End If
Finally…
set crop to originalCrop
Set inside the IF block, so that it only executes IF things went wrong with the cropping. IF so, Put the crop back where it was. Pretend nothing happened. Move right along.
What Does a Negative Crop Look Like?
Unfortunately the World’s End is only one of the dragons that awaits a stalwart cropper. Capture One also behaves poorly when the crop is set to a negative value. It’s pretty easy trap to avoid this when you’re setting a specific known value (e.g. set crop height to 500 px). But it is easy when you’re computing that value. For example if your code shortens the crop by 100 pixels and the crop starts off with a height of 9000 pixels all is right with the universe as the result is a height of 8900 pixels (a most decidedly non-negative value), but quickly runs into problems if the crop starts off 90 pixels high.
A related issue is that if the crop height and crop width are set to 0 then the crop is reset (so that no part of the image is cropped).
Who would run a script that reduces the crop by 100px when the crop is 100px or 90px high? It’s a rather daft thing to do right?
Well one of the golden rules of programming is users sometimes try to do dumb things. When I was learning to program I was understandably not great at it. I once had a situation where a user could get themselves into a situation where the interface was stuck. I couldn’t figure out how to avoid that situation before the launch date for the software, but I did find a sort of loophole; whenever the interface would get stuck I could draw a working button that, when the user pressed it, would report “The interface has locked up. Nothing will work until you restart the software.” It had been a long day, so I added an easter egg message that would appear if the user clicked that button 10 times in a row. Restarting the software restarted that counter so that the message only appeared if a Sisyphean (or masochistic) user kept clicking a button that was clearly not going to do anything useful. The message was “Hey dummy, stop clicking me, and restart the software already” – we received numerous complaints within a day.
Now, as then, the right solution is to prevent the problem in the code, rather than allow the user to experience it. Safeguarding code against weird situations is half of coding (the other half is largely comprised of troubleshooting).
Fortunately hedging against the possibility of a negative crop is easy.
tell application "Capture One 10.2 CH"
   set currentSelection to selected variants
   repeat with theVariant in currentSelection
      tell theVariant
        set originalCrop to crop
        set desiredCropHeight to (crop height - 100)
        set crop height to desiredCropHeight
        if crop height is not equal to desiredCropHeight OR crop height is less than 0 OR crop width is less than 0
          set crop to originalCrop
        end if
     end tell
   end repeat
end tell
There may be even more situations in which bad things happen when trying to set a crop. You can safe guard your code by following Best Practices, or by Playing Psychic and trying to anticipate all the ways things may go wrong, or by sharing the code with another set of expert eyes. But ultimately your code needs to be tested by actual users who may immediately use the code in ways you didn’t expect. That’s what beta periods are all about.
Taking it To New Heights Widths and Positions
So far we’ve been working with Crop Height.
Crop Height is its own thing. As we’ve done in previous examples we can reference it without involving any other attribute of the crop (e.g. it’s width). However, it is also a child of Crop. The components of Crop are {centerX, centerY, width, height} so if we want to change the height of a crop we can do so either by setting the value of Crop Height or by changing the {height} item of Crop, which is the fourth item of Crop.
This won’t accomplish any new functionality in this example, but it prepares us to work with the other three attributes of crop (centerX, centerY, and width) without a lot of redundant code.
set cropDelta to 100
set cropMethodID to 4
tell application "Capture One 10.2 CH"
   set currentSelection to selected variants
   repeat with theVariant in currentSelection
      tell theVariant
         set originalCrop to crop
         set desiredCrop to originalCrop
         set (item cropMethodID of desiredCrop) to ((item cropMethodID of originalCrop) - cropDelta)
         set crop to desiredCrop
         if crop is not equal to desiredCrop or crop height is less than 0 or crop width is less than 0
            set crop to originalCrop
         end if
      end tell
   end repeat
end tell
Here we’ve made several changes, but fewer than it may seem. We are now getting, changing, and setting the Crop rather than the Crop Height. Remember that Crop consists of {centerX, centerY, width, height}.
set cropDelta to 100
set cropMethodID to 4
At the top of the script we set a variable called itemNumber to 4, the item number associated with Crop Height. We’ve also created variable called cropDelta for the change in the crop dimension. If, later we want to change either of these values we don’t have to hunt for them in the busy core of the code.
 set originalCrop to desiredCrop
 set (item cropMethodID of desiredCrop) to ((item cropMethodID of originalCrop) - 100)
In the previous example we used “set desiredCropHeight to (crop height – 100)” to create the variable desiredCropHeight. In this new example we create a new variable desiredCrop which is initially set to be equal to originalCrop, and then we separately change it’s fourth item (cropHeight). Since we don’t make any changes to item 1 (centerX), item 2 (centerY), or item 3 (width) the other attributes of the crop remain the same.
set crop to desiredCrop
if crop is not equal to desiredCrop or crop height is less than 0 or crop width is less than 0
   set crop to originalCrop
end if
Instead of setting only Crop Height we are setting Crop which includes all four crop attributes. Since the lines above this start with the original crop and only modifies the fourth item (height) the end-effect is identical to the previous example; only Crop Height is changed.
Choose Your Own Adventure
In the previous example we modified the code so that it was modifying Item 4 of Crop (Crop Height). Now we will modify the code to allow the user to select which Item of Crop they wish to modify. Here is some code that prompts the user to select from a list and then sets the cropMethodID accordingly.
set cropMethods to {"Height - Decrease", "Width - Decrease", "Nudge Left", "Nudge Down"}
set cropMethod to item 1 of (choose from list cropMethods without multiple selections allowed)

if cropMethod contains "left" then
   set cropMethodID to 1
else if cropMethod contains "down" then
   set cropMethodID to 2
else if cropMethod contains "width" then
   set cropMethodID to 3
else if cropMethod contains "height" then
   set cropMethodID to 4
end if
Here we omit the rest of the code from the previous example to focus on setting the cropMethodID based on a text indication of what type of crop change the user wants to make.
set cropMethods to {"Height - Decrease", "Width: Decrease", "Nudge Left", "Nudge Down"}
Here we set a list variable with some human-friendly versions of “Item X of Crop”. So far our example has always reduced the selected crop attribute by 100, so the list currently omits “positive” crop changes such as making the crop wider (Width: Increase) or shifting the crop to the right (Nudge Right).
set cropMethod to item 1 of (choose from list cropMethods without multiple selections allowed)
Don’t get too friendly with this line; we’re going to axe it soon. It asks the user to choose from the list of crop methods. The problem with this is speed. We want this tool to be extremely fast to use and to take effect with a single keystroke. So later, we’ll scrub the idea of asking the user to select the cropMethod from a dialog.
If you do use Choose from List in a script do note that what it returns is a list of the users choices. This is true even if the user only selected one item from the list. If the user selects only one item then the command returns a one-item long list, but it is still a list. Note that in the above code we use the modifier “without multiple selections allowed” so the only possible outcome is a list of one item. When what you want is a single word (a String in programming parlance) working with a list is annoying; therefore we set cropMethod to “item 1 of [the selected items list]”.
if cropMethod contains "left" then
 set cropMethodID to 1
else if cropMethod contains "down" then
 set cropMethodID to 2
[...]
The computer isn’t smart enough to know what “left” means in the context of the Crop AppleScript command. We have to explicitly translate what each of the methods means. Note that instead of [if cropMethod equals “Nudge Left” then] we use [contains: “left”]. This is a bit more robust and future proof since the former would fail if we change cropMethods to “scooch leftward” while the latter would still work – as long as the string (aka text) contains the “left” somewhere in it . Also note this operator (like most things in AppleScript) is NOT cap sensitive unless we explicitly ask it to be: by default “left”, “LEFT” or even “LeFt” are all the same.
There are more elegant ways of accomplishing translating the human-readable text into cropMethodID, but they require some more advanced concepts, and for a short and simple script like we are writing our current verbose method is workable and readable.
Going Positive
So far we’ve only dealt with decreasing the value of the desired crop attribute by a fixed value of positive 100. That’s pretty limiting! To allow the script to increase the height or width, or to nudge the crop to the right or down we’ll need to make a couple minor tweaks to the code.
set cropMethods to {"Height - Decrease", "Height - Increase", "Width - Decrease", "Width - Increase", "Nudge Left", "Nudge Right", "Nudge Down","Nudge Up"}
set cropMethod to item 1 of (choose from list cropMethods without multiple selections allowed)
if cropMethod contains "left" or cropMethod contains "right" then
  set cropMethodID to 1
else if cropMethod contains "down" or cropMethod contains "up" then
  set cropMethodID to 2
else if cropMethod contains "width" then
  set cropMethodID to 3
else if cropMethod contains "height" then
  set cropMethodID to 4
end if

if cropMethod contains "left" or cropMethod contains "down" or cropMethod contains "decrease" then
  set cropDelta to cropDelta * -1
end if
At this point, rather than break out each line change we’ll simply highlight the changes in yellow. Everything here is an extension of techniques we’ve already used. We add options for for increasing (rather than decreasing) height or width and nudging the crop to the right or up (rather than down or left). When one of those options is selected the variable cropDelta is multiplied by negative one to achieve that direction of movement. For example nudging to the right is an increase of 100 pixels to the CenterX of the crop, while nudging to the left is a decrease of 100 pixels to the CenterX of the crop.
Teaching the Car to Drive Itself
So far we’ve asked the user, every time the script is run, to select what kind of change to make to the crop. Remember our stated goal was “We want to be able to modify the crop from the keyboard in a variety of ways with a single keystroke”. Currently we could make the script run with a single keystroke but that keystroke would have to be followed by selecting the type of crop change. To modify the crop with a “single keystroke” the script itself must run without any user prompt (since we must use up our one keystroke telling the script to run).
We will do this by having the script read its own filename as an instruction for how to proceed. To do this we replace these two lines
set cropMethods to {"Height - Decrease", "Height - Increase", "Width - Decrease", "Width - Increase", "Nudge Left", "Nudge Right", "Nudge Down","Nudge Up"}
set cropMethod to item 1 of (choose from list cropMethods without multiple selections allowed)
With the single line:
set cropMethod to name of (info for (path to me))
Rather than setting cropMethod by populating a list of options and then asking the user to select them, this sets the cropMethod to the name of the script. For example if we name the script “Decrease Height.scpt” it would accomplish the same thing as the previous script would if we launched it and the user selected “Decrease Height” from the popup. But the script now does its work without asking the user for anything.
Ready to Use Script
With the above changes our final script reads as follows:
set cropDelta to 100
set cropMethod to name of (info for (path to me)) -- find the name of the script
if cropMethod contains "left" or cropMethod contains "right" then
  set cropMethodID to 1
else if cropMethod contains "up" or cropMethod contains "down" then
  set cropMethodID to 2
else if cropMethod contains "width" then
  set cropMethodID to 3
else if cropMethod contains "height" then
  set cropMethodID to 4
end if

if cropMethod contains "left" or cropMethod contains "down" or cropMethod contains "decrease" then
  set cropDelta to cropDelta * -1
end if

tell application "Capture One 10.2 CH"
  set currentSelection to selected variants
  repeat with theVariant in currentSelection
    tell theVariant
      set originalCrop to crop
      set desiredCrop to originalCrop
      set (item cropMethodID of desiredCrop) to ((item cropMethodID of originalCrop) + cropDelta)
      set crop to desiredCrop
      if crop is not equal to desiredCrop or crop height is less than 0 or crop width is less than 0 then
        set crop to originalCrop
      end if
    end tell
  end repeat
end tell
It’s ready to use as long as we name the script something that is “allowed” by the code such as “Increase – Height.scpt”.
A Fleet of Self Driving Cars
We currently have a single script which, when renamed would affect the crop differently. We duplicate this script and rename its brothers and sisters so that there is one copy of it named for each of the options we care about. Note that we have some liberty in the exact names of the scripts; as long as the name includes [“increase” or “decrease” and “height” or “width”] or [“left” or “right” or “up” or “down”] it will still be parsed correctly in the script.
Finally we place them in a subfolder of [User Library > Scripts > Capture One Scripts] to keep them organized together. We won’t be calling them from the menu system (we will be adding keyboard shortcuts) and don’t want them mucking up the main scripts dropdown.

Adding the Fuse
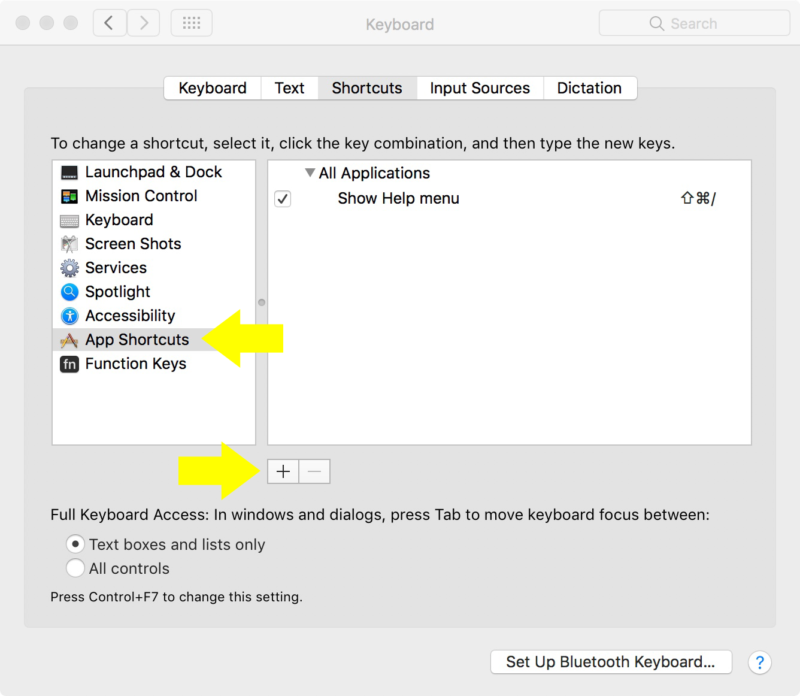
Now we only need to add a keyboard shortcut for each of these crop functions. Unfortunately you cannot add a keyboard shortcut to a script using Capture One’s built in Edit Keyboard Shortcuts menu. There are numerous very good tools out there that can do this, including Apptivate which is freeware. But for the sake of wrapping up this solution without needing additional software we’ll use a built in OSX Feature.
Step 1: Select [OSX > System Preferences > Keyboard > Shortcuts > App Shortcuts > + ]
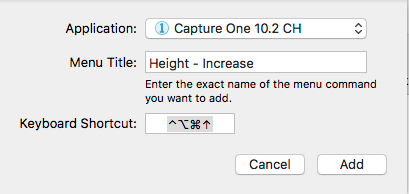
Step 2: Select Capture One, type (or copy-paste) the exact name of the script, and enter the desired keyboard shortcut. The shortcut I’ve selected looks like a visual mess, but on a Mac keyboard it’s just the three bottom-left-most keys (command, control, option) and the up arrow.
Note in the screen grab below the Application is listed as “Capture One 10.2 CH” because I run multiple versions of Capture One and have renamed this version from the default of “Capture One 10”.
Step 3: Return to Capture One and confirm that you’ve done step 2 correctly by seeing if the shortcut now shows up next to the script in the dropdown menu.
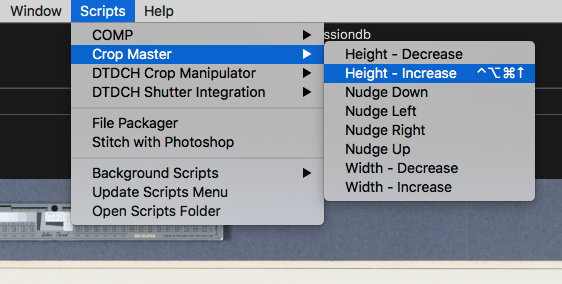
Step 4: Repeat steps 2 and 3 for the other crop effects you want a keyboard shortcut for. The whole point of a custom shortcut is you can make it whatever you want (as long as it doesn’t conflict with an existing shortcut). But if you’re looking for a specific suggestion:
| Nudge Up | Control-Command Up |
| Nudge Down | Control-Command Down |
| Nudge Left | Control-Command Left |
| Nudge Right | Control-Command Right |
| Height – Increase | Control-Command-Option Up |
| Height – Decrease | Control-Command-Option Down |
| Width – Increase | Control-Command-Option Right |
| Width – Decrease | Control-Command-Option Left |
Getting Fancy
DT CropControl, as shown in this article, can be used without any external software and with the default Apple keyboard. But if you don’t love remembering four-key keyboard shortcuts you might consider a Tangent Keyboard which is natively integrated into Capture One. Or if you just need help remembering certain default shortcuts the far less expensive Capture One Keyboard is a good option.
Want More?
If you’ve made it to the end of this lengthy and detailed article then you might be interested in diving deeper in Capture One AppleScripting.
- Our Capture One Masters Program includes some AppleScript in the curriculum.
- Through On-Site Consulting we can help with your Capture One AppleScripting needs, either to consult on your code, or to write it for you.
Post Script: Making it Ready for the Masses
If the person writing/modifying this script is the only one using the script then we can probably call it quits. But if this script is to be given to other people then we need to add some credits (to take proper credit for your work, and to give future readers some hope of contacting you if they come across the script and have questions, error trapping for unexpected situations (e.g. the script is not named according to the allowed list), some inline documentation, and some instructions for use (e.g. a Readme file). The version of this script that you’ll find in the DT Capture One AppleScript Building Blocks has these kind of accoutrements.
*This is not strictly true. If the box “Crop Outside the Image” is checked then Capture One will allow the crop to be drawn up to the limits of the smallest rectangle that contains the image. When the image is rotated (e.g. 5 degrees) or when the Keystone or Distortion Correction tools are used this means you can crop into an area of black nothingness. For the purpose of this blog article we ignore those situations; we can only cover so much ground!