
Uncategorized
5 Things a View Camera Can Do That Your DSLR Can’t
Aug
Modern DSLRs and mirrorless cameras are capable tools – photographic Swiss Army knives, with broad feature sets appealing to all types of photographers.
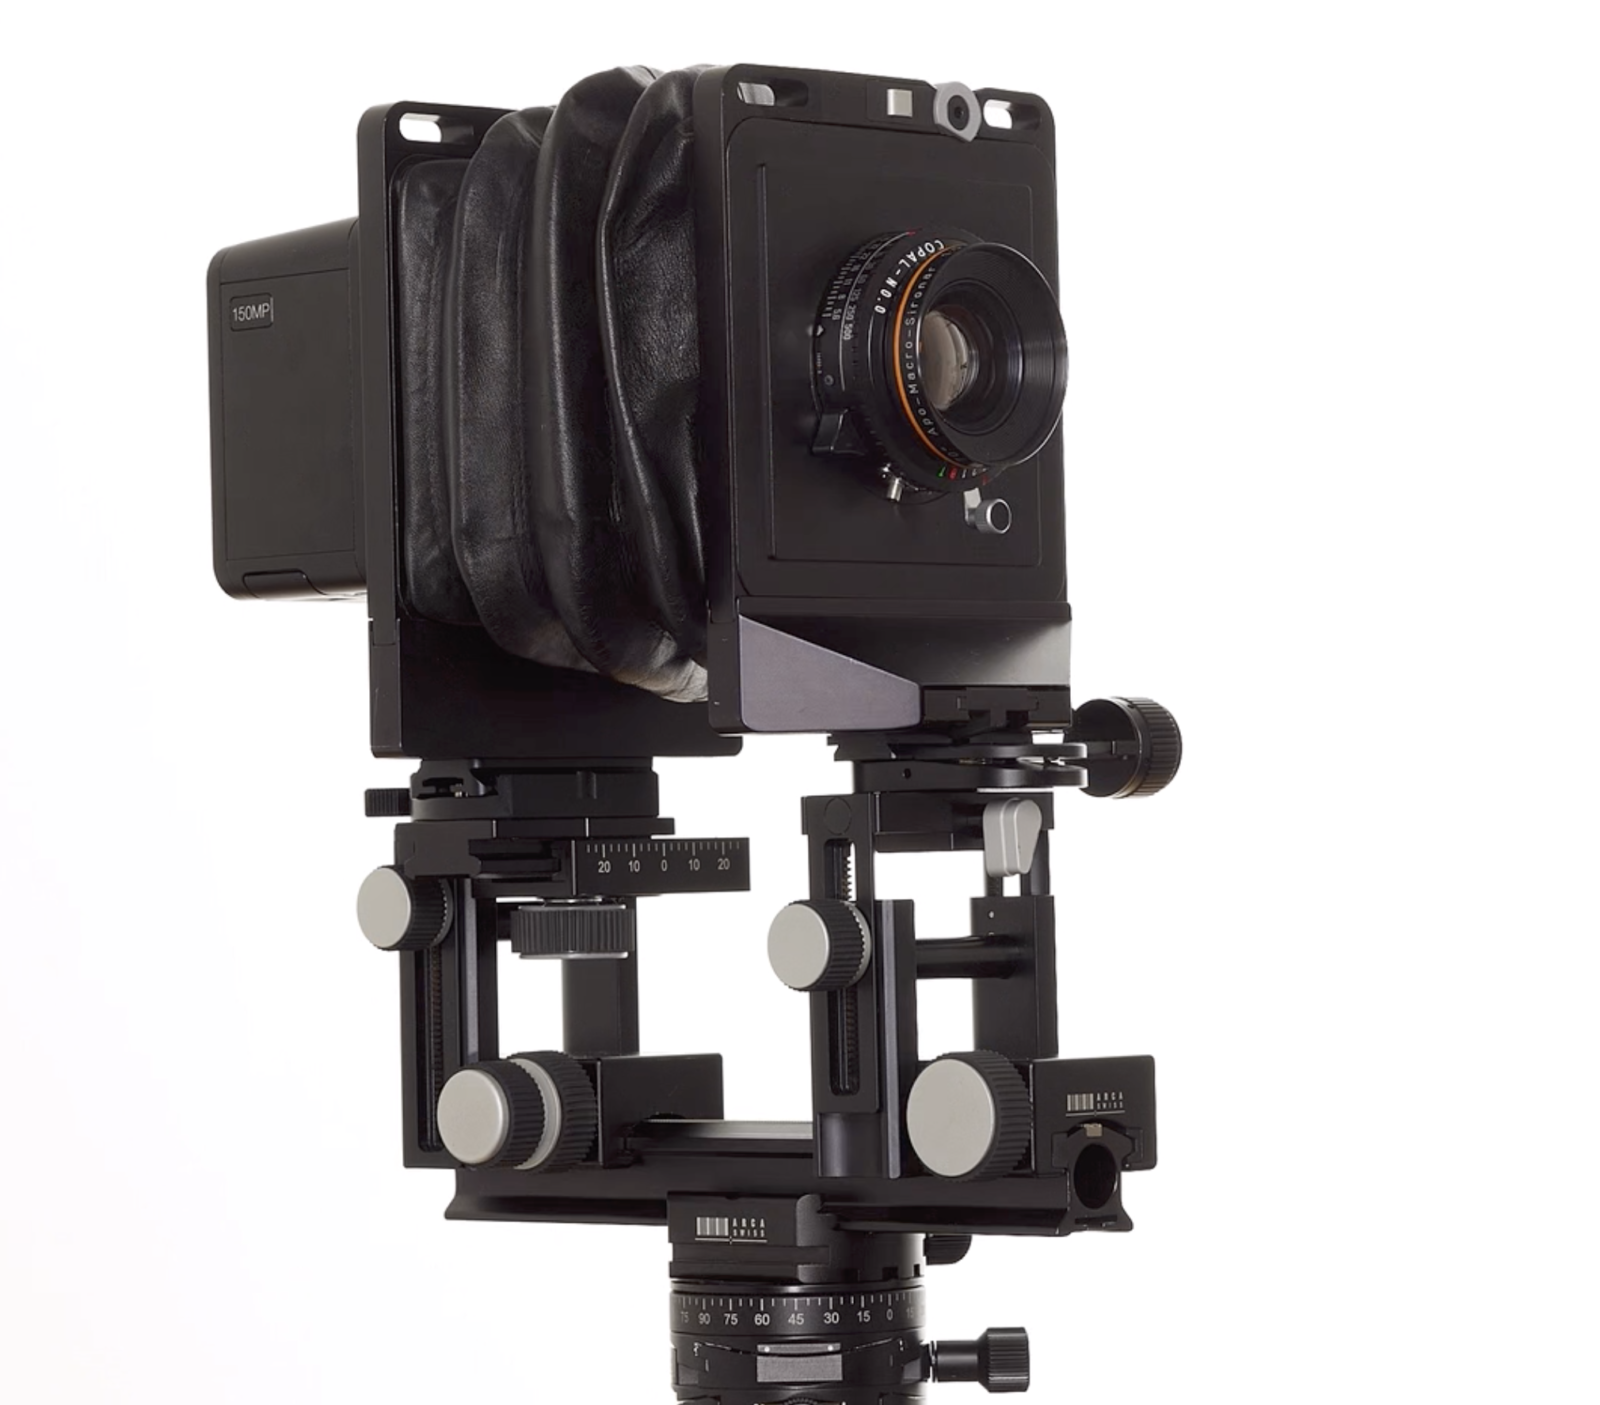
But for serious projects, a Swiss Army knife isn’t enough — you need a specialized tool that does one thing flawlessly. For many architectural and landscape photographers, even in an era where digital 35mm sensors have become quite capable, this means using view cameras, not unlike this one:

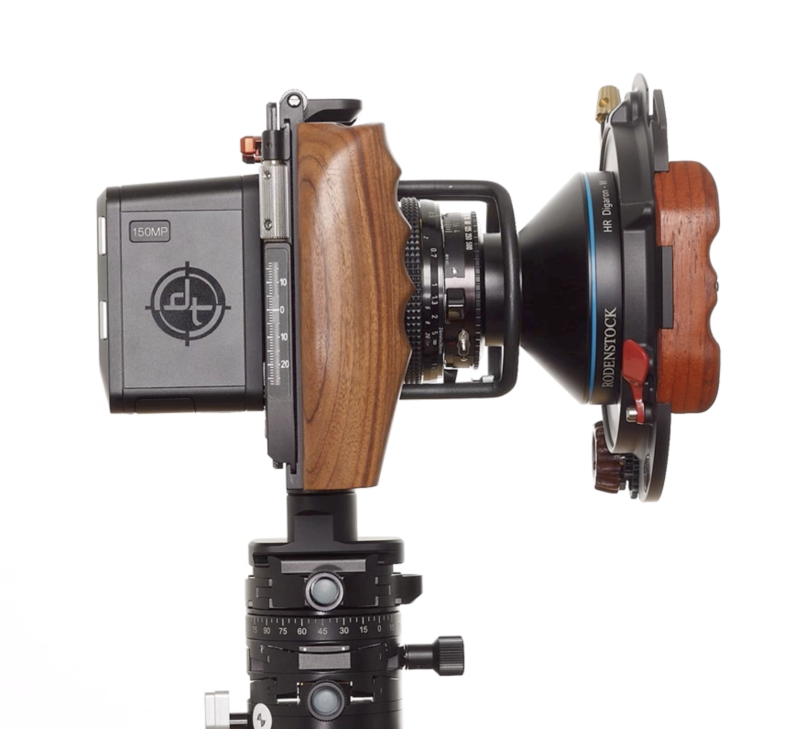
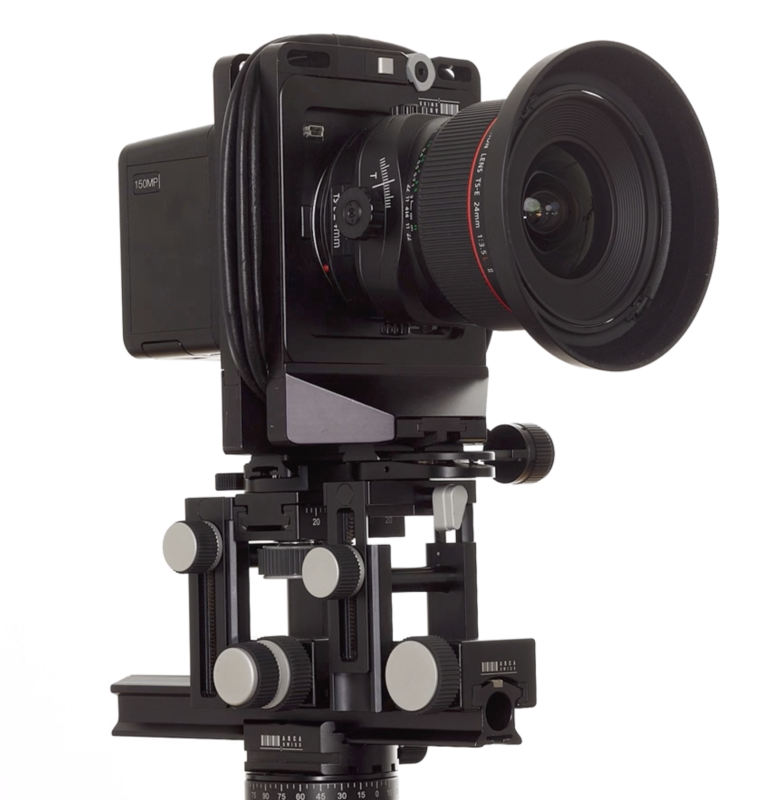
This is a bit of an exaggeration of course — modern view cameras are a far cry from the behemoth above, with sleek designs like this:
But why on earth would someone use what is fundamentally 19th century camera technology over 150 years later? Well, it turns out that there are things that even the oldest view cameras can do that your cutting-edge 35mm camera just can’t.
A few quick notes on terminology throughout this article:
1. DSLRs and mirrorless cameras with standard 36 mm x 24 mm sensors are referred to interchangeably as “35mm systems.” Systems with 44 mm x 33 mm sensors will be referred to as “medium-format crop systems,” and systems with 54 mm x 40 mm sensors will be referred to as “true medium-format systems”
2. We use “view camera” as an all encompassing term covering monorail cameras, field cameras, and technical cameras, of all sizes, whether used with film or digital sensors.
1) The Ultimate Perspective Control and Composition Tools
Perspective control may be the number one reason composition-focused landscape and architectural photographers use view cameras.
Perspective, or the way that objects in three dimensional space are rendered with respect to one another in terms of size and position when projected in a two dimensional image, is a function of two things: where the lens is physically located in space, and the angle at which the film or sensor the image is projected on (we’ll call this the imaging plane) is oriented in relation to the subject.
With any camera — 35mm, view, or otherwise — the placement of the lens is simply determined by where you set up your camera in the scene. Setting aside composition for a moment, the first step in image making is choosing where to stand!
As simple as it may seem, this is exceptionally important. Even small changes in position can make a big difference in perspective. Stepping a bit to the left or right can change the distance between buildings in a skyline; moving the camera up and down can vary how objects in the foreground occlude those in the background, and moving closer into or further out of a scene can change the size of objects in the foreground and background relative to one another.
Once we have our camera positioned in the right spot, we need to establish the angle of our imaging plane to the subject. 99% of the time, for landscape and architecture, this will involve leveling the camera to the ground to eliminate a phenomenon known as “converging verticals,” where lines that are parallel in space appear to come together at a single “vanishing point.” Here’s an example of an image with converging verticals:
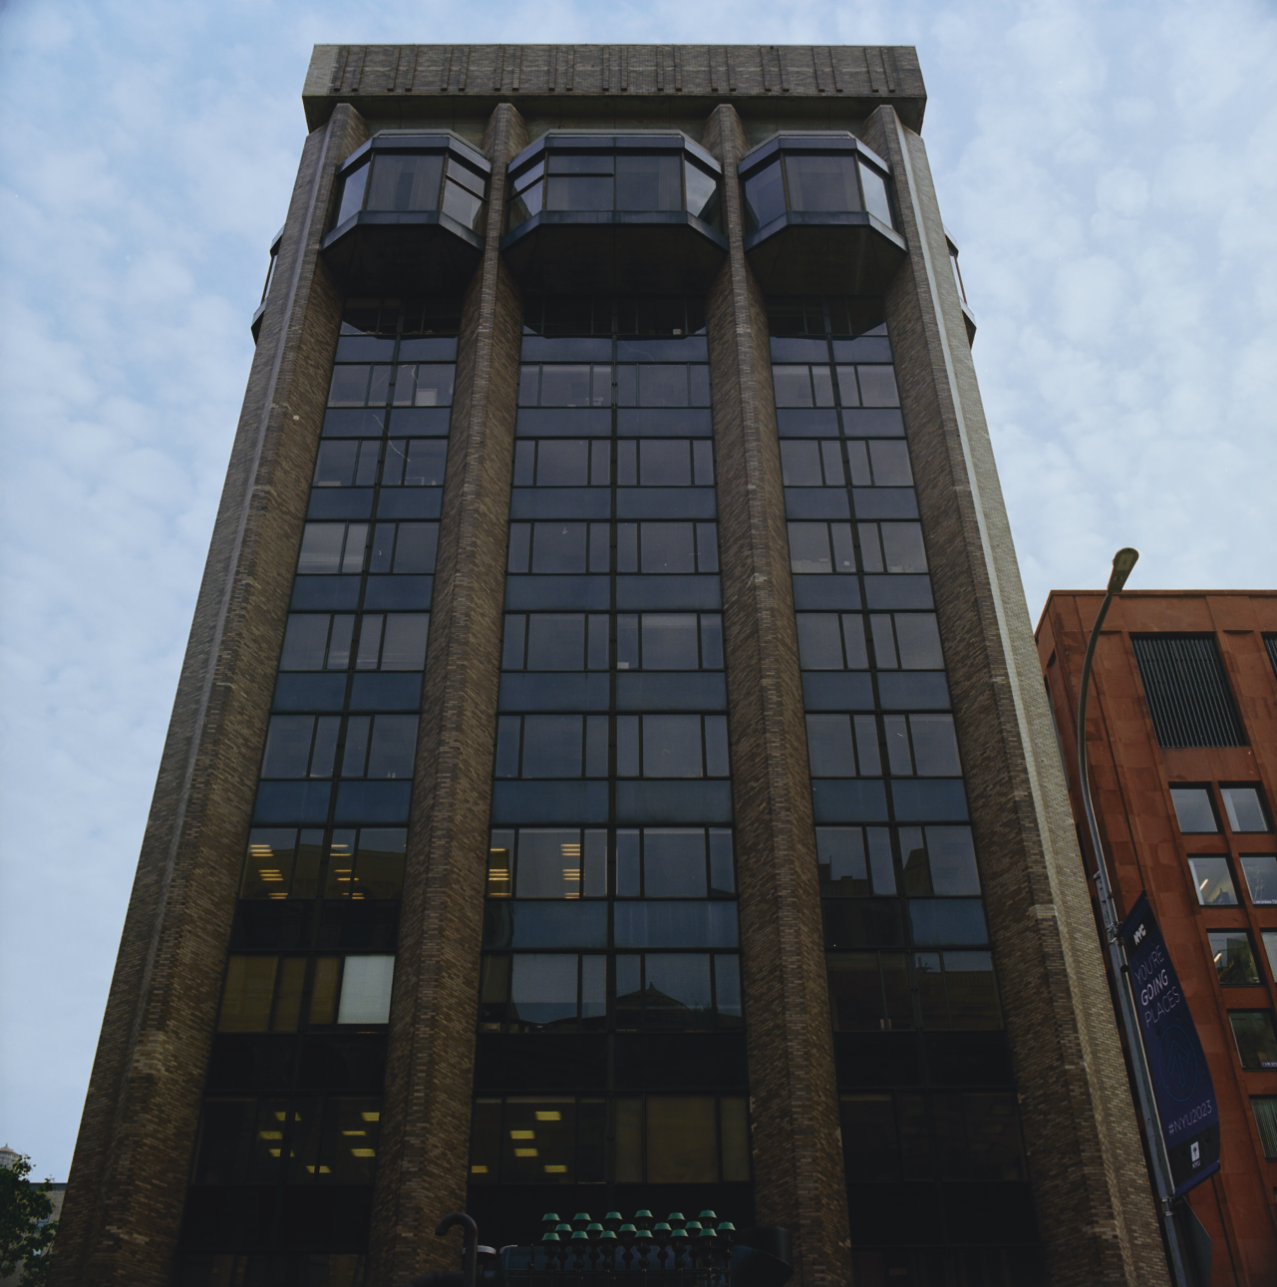
See how the vertical lines of the building come closer to one another near the top of the frame? Any time a camera is not level (or more precisely, any time the imaging plane is not parallel to the object – shooting the Leaning Tower of Pisa with a camera leveled to the ground would actually result in converging verticals because the object itself is not parallel to the imaging plane, but that’s what you’d want given that it’s not straight and that’s kind of the point!), we will get this effect.
So far all of this can be achieved on any camera. But we still haven’t considered the next step of image making – composition.
The catch with 35mm systems is that in order to achieve your intended composition, you may have to move to a different location to get the framing you’re looking for, changing the position and size of objects relative to one another, or adjust the angle your camera is oriented with respect to the subject – for instance, leaning back to capture the top of a skyscraper, or down towards a valley or canyon – resulting in converging verticals.
In a case like this, there is technically one solution that does not involve movements – we can level our camera and use wider and wider lenses, until we are able to get the desired framing in a subsection of our image, or capture the top of our building or bottom of our canyon. There are a few issues with this, however:
- We are effectively throwing away a large portion of our image/resolution by capturing additional foreground/background that we’re not interested in.
- A wide-enough lens for our system may not exist, and as lenses get wider, they become more and more difficult to design and correct for linearity without making compromises in optical quality.
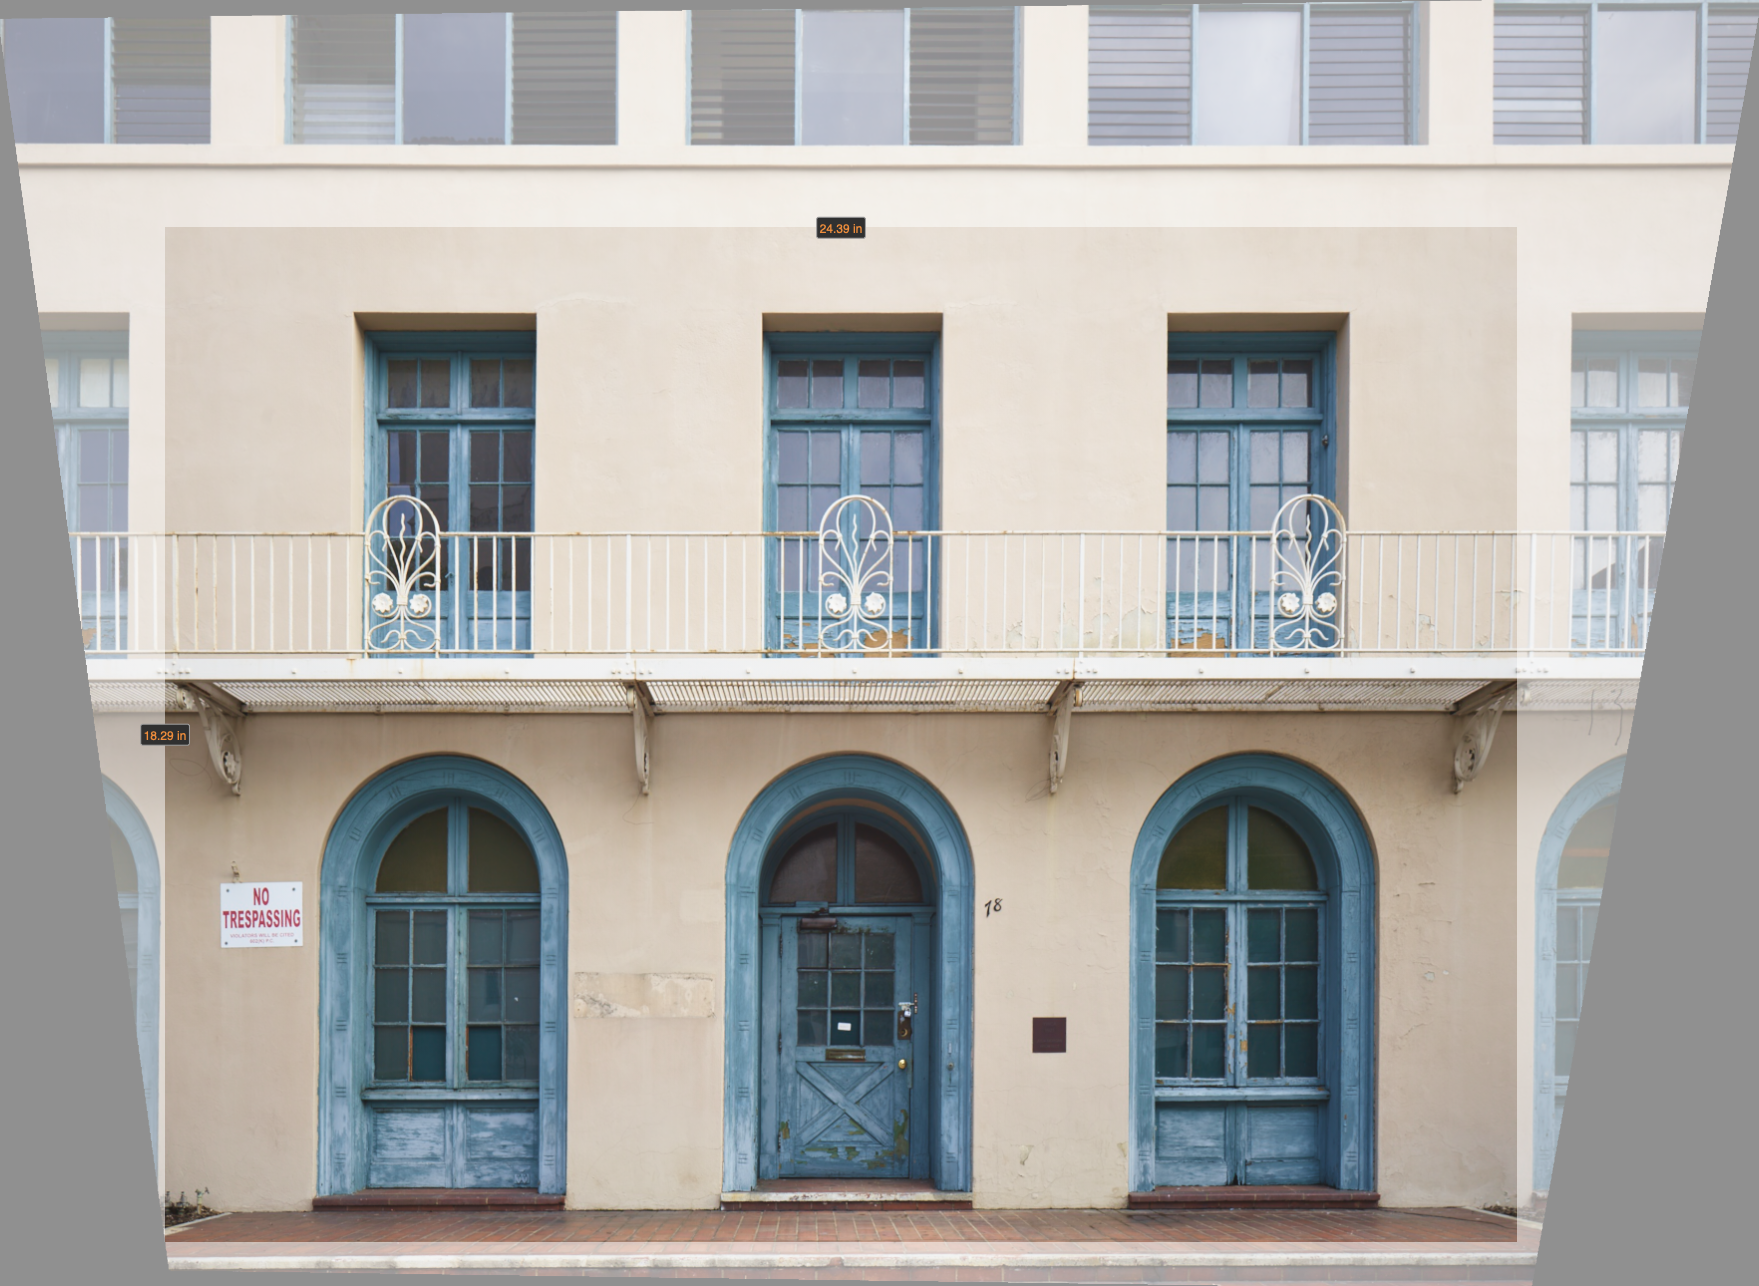
Here’s an example of an image where I’ve tried to do that:
I’ve successfully kept my parallel lines straight on the skyline, but I’ve absolutely murdered my file through rotating, cropping, and keystone correcting slightly in post.
On a view camera, we have movements which make these problems disappear! Among the various possible movements available, view cameras offer the ability to move the imaging plane within the image circle cast by the lens without moving the lens position, tilting the camera, or resorting to ultra-wide-angle lenses.
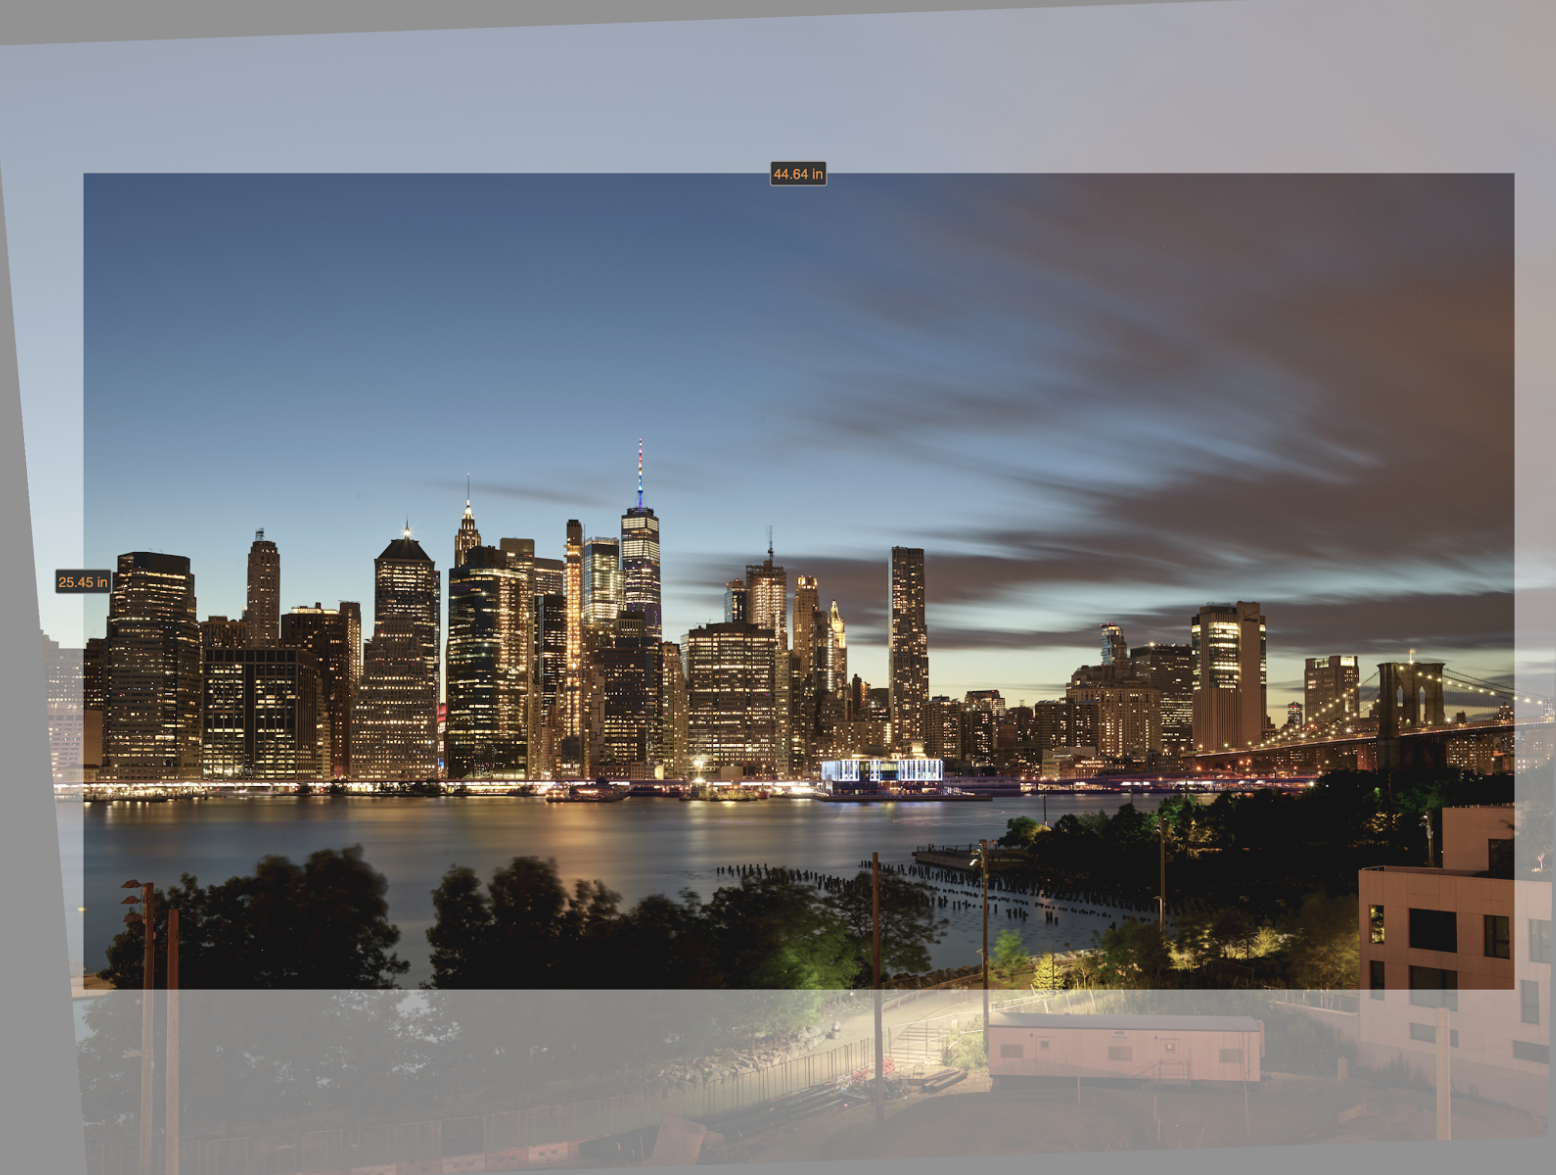
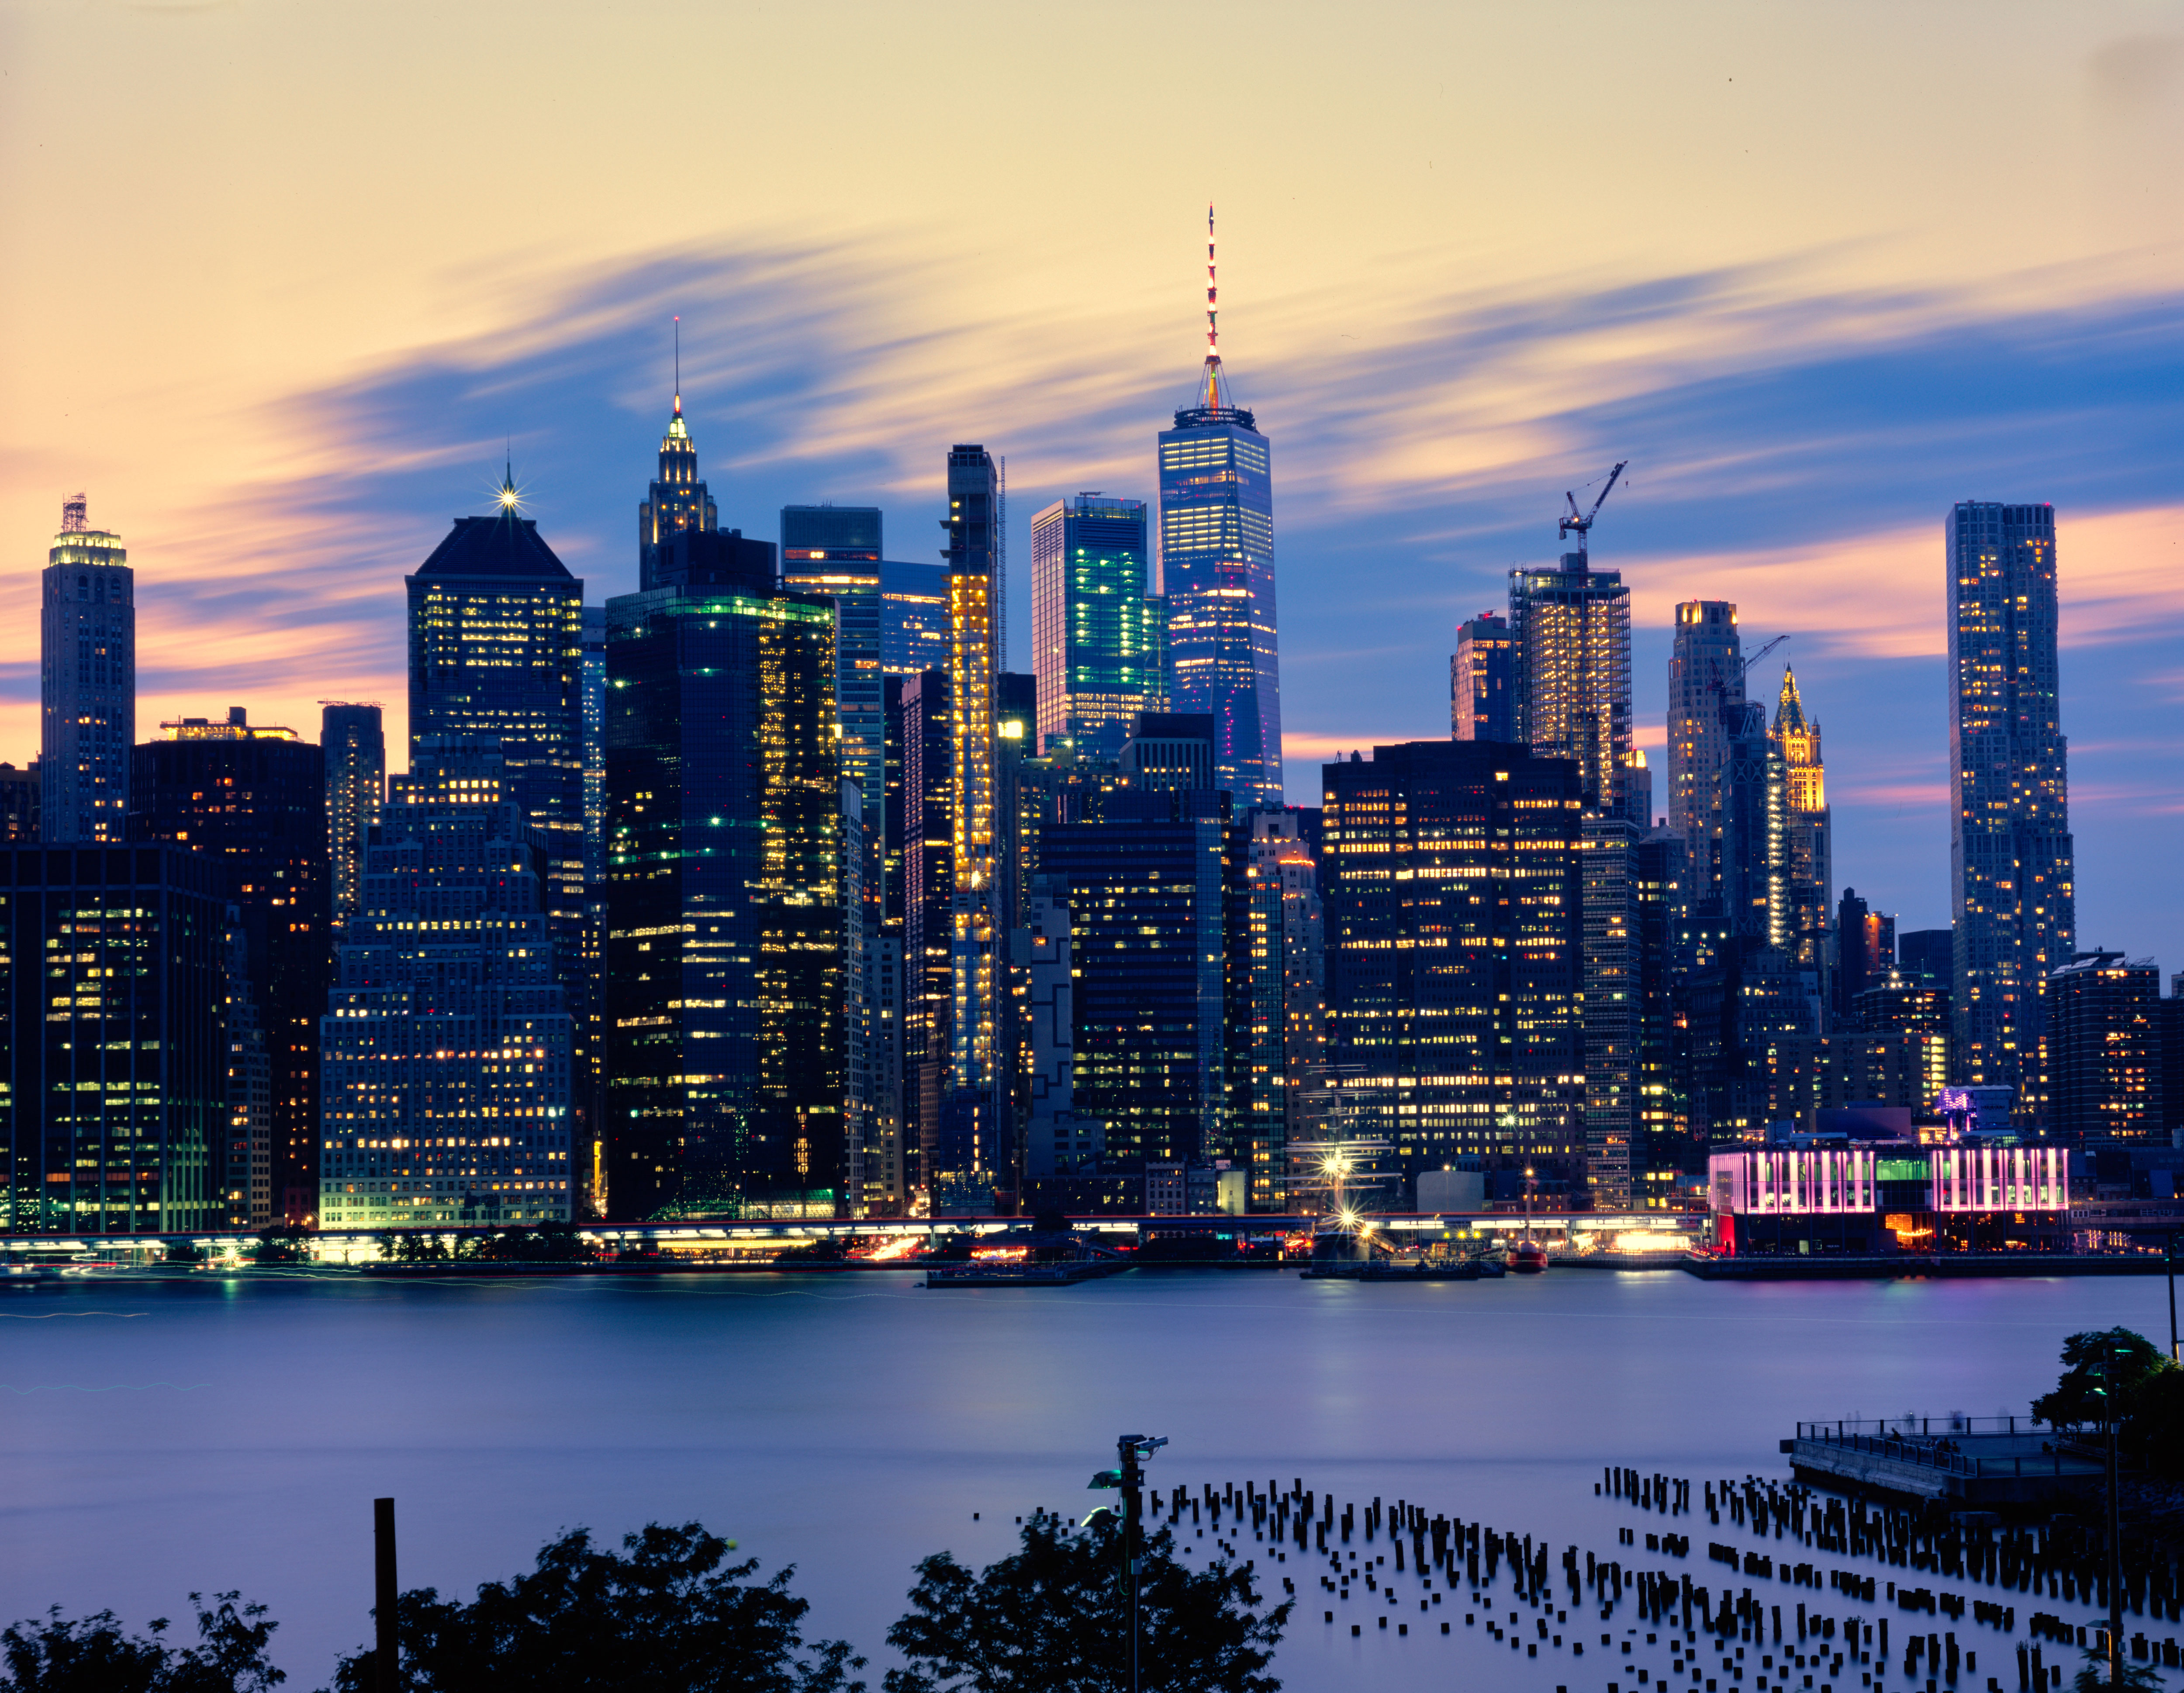
As a result, we can set up our positioning and camera angle exactly as we want it, and then use movements to perfect our composition without cropping and losing resolution, or causing converging verticals. In a super simple example, take a look at the image below — on my 4×5 view camera, I’m able to shoot straight at the horizon, avoiding converging verticals, and shift my image plane to completely avoid the ugly construction sight in the foreground. Piece of cake!
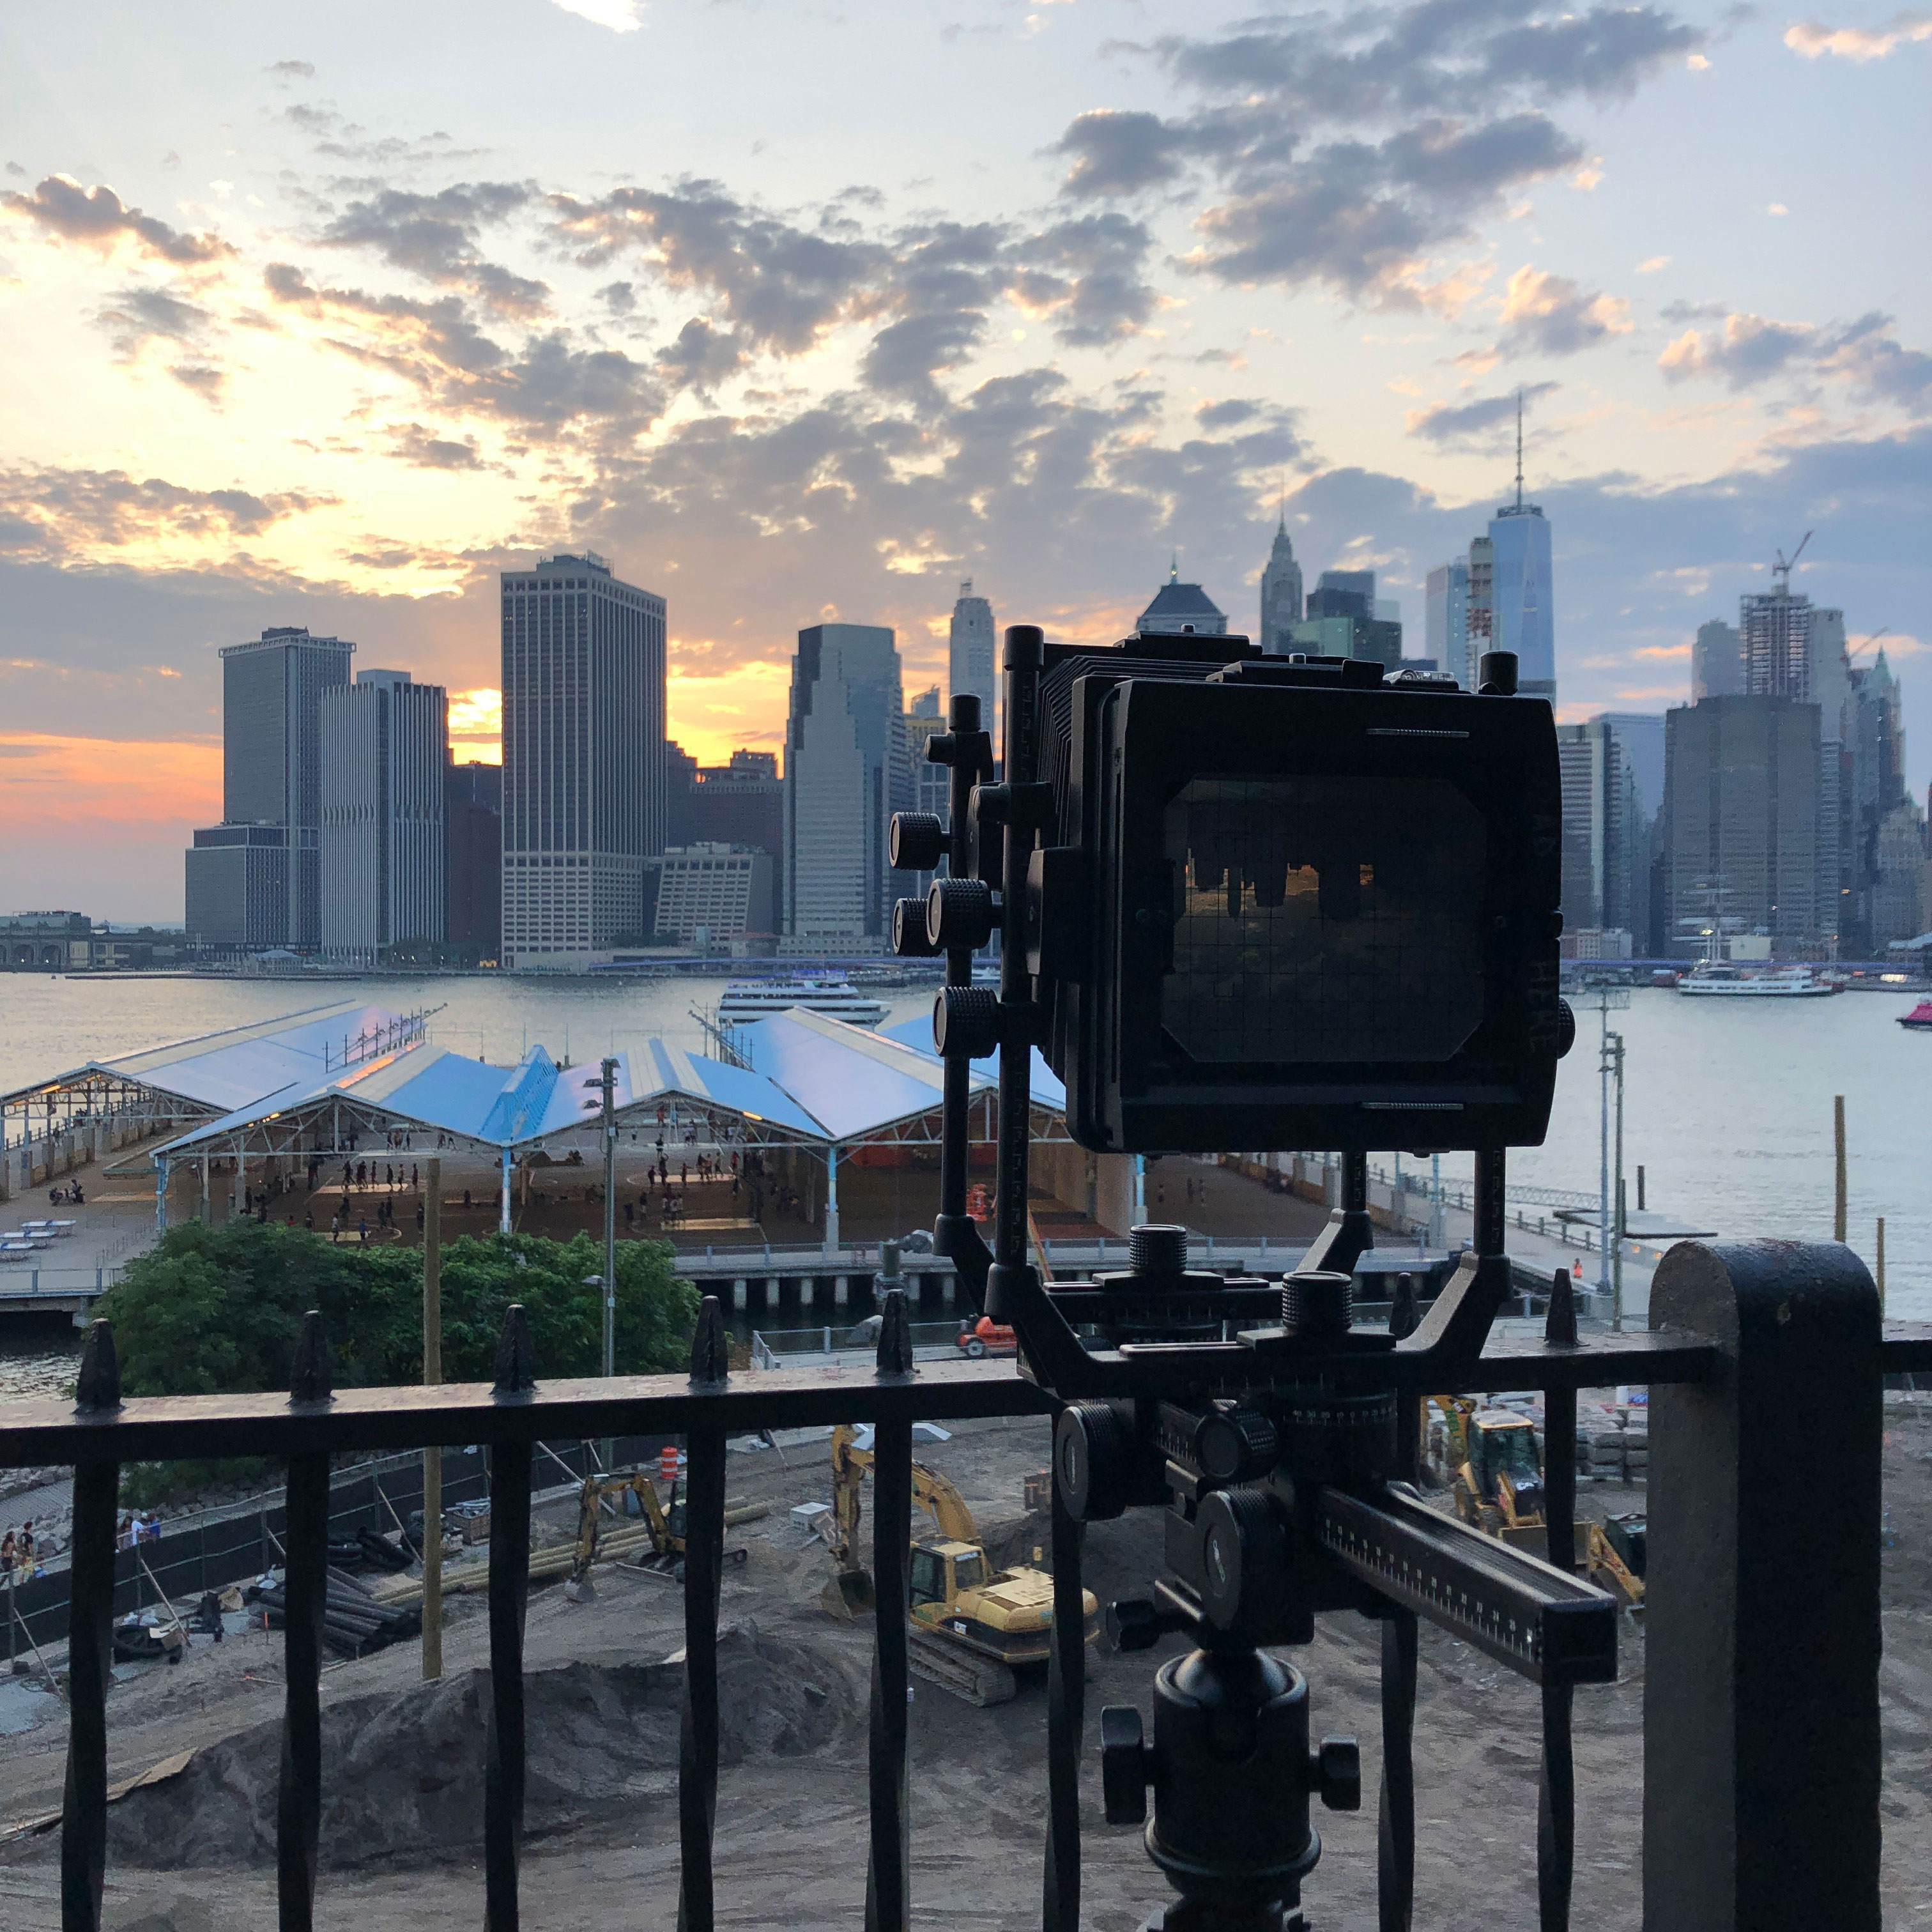
Using these techniques, I was able to get this image that evening without cropping, rotating, or keystoning:
Now I know, you may be thinking I’m not giving 35mm systems a fair shake here – what about Tilt/Shift lenses? Great question.
Tilt/Shift lenses for 35mm systems are a great workaround, but have a few major limitations.
First off, there are a limited number of focal lengths available, typically no more than three or four for a particular camera system. By contrast, all lenses on a view camera have a full range of movements.
More importantly though, all shift/rise/fall movements on 35mm cameras move the lens plane rather than the imaging plane, resulting in slight changes in perspective — the very thing we are trying to avoid!
The last issue is that typically these movements are limited to a narrow range, and often cannot be used on multiple axes at the same time — for instance, on Canon TS-E lenses, one can use horizontal or vertical movements, but not both.
Now what about keystone correction tools in image processing programs like Capture One? Another great question!
Keystone corrections are typically used to eliminate converging lines, and in small amounts, can give good results given robust enough files. However, they inevitably cut into resolution, force odd crops onto images, and require image interpolation in uneven amounts across the frame. Additionally, while they can compensate for undesirable camera angling, they cannot compensate for imperfect camera positioning.
In short, modern technology has given us great tools to compensate for a lack of movements in 35mm systems, but as every photographer knows, nothing beats getting images right in-camera. For another illustration of this principle in action, see this short article.
2) Simple Lenses, Sharper Images
While view cameras may seem complex than 35mm systems, in some ways they’re actually much, much simpler. One of the ways in which this is true is in the way lenses are designed and focused.
On a 35mm system, a fixed mirror box or flange distance from the lens mount to sensor sets the design constraints around which an entire lineup of lenses is constructed. These differ from manufacturer to manufacturer — Nikon F-mount is different than Canon EF-mount, which is different from Hasselblad H-mount, which is different than Phase One M-mount, etc., and can even differ within a manufacturer’s lineup if they have both DSLR and mirrorless options.
Because 35mm lenses must be built around these constraints from the very beginning of their design, they have a set of hoops to jump through before anything else can be addressed. This leads to complicated lens designs — for example, the Sony 24-70mm f/2.8 GM lens pictured below has over 18 elements across several groups, many of which move independently when zooming and focusing.
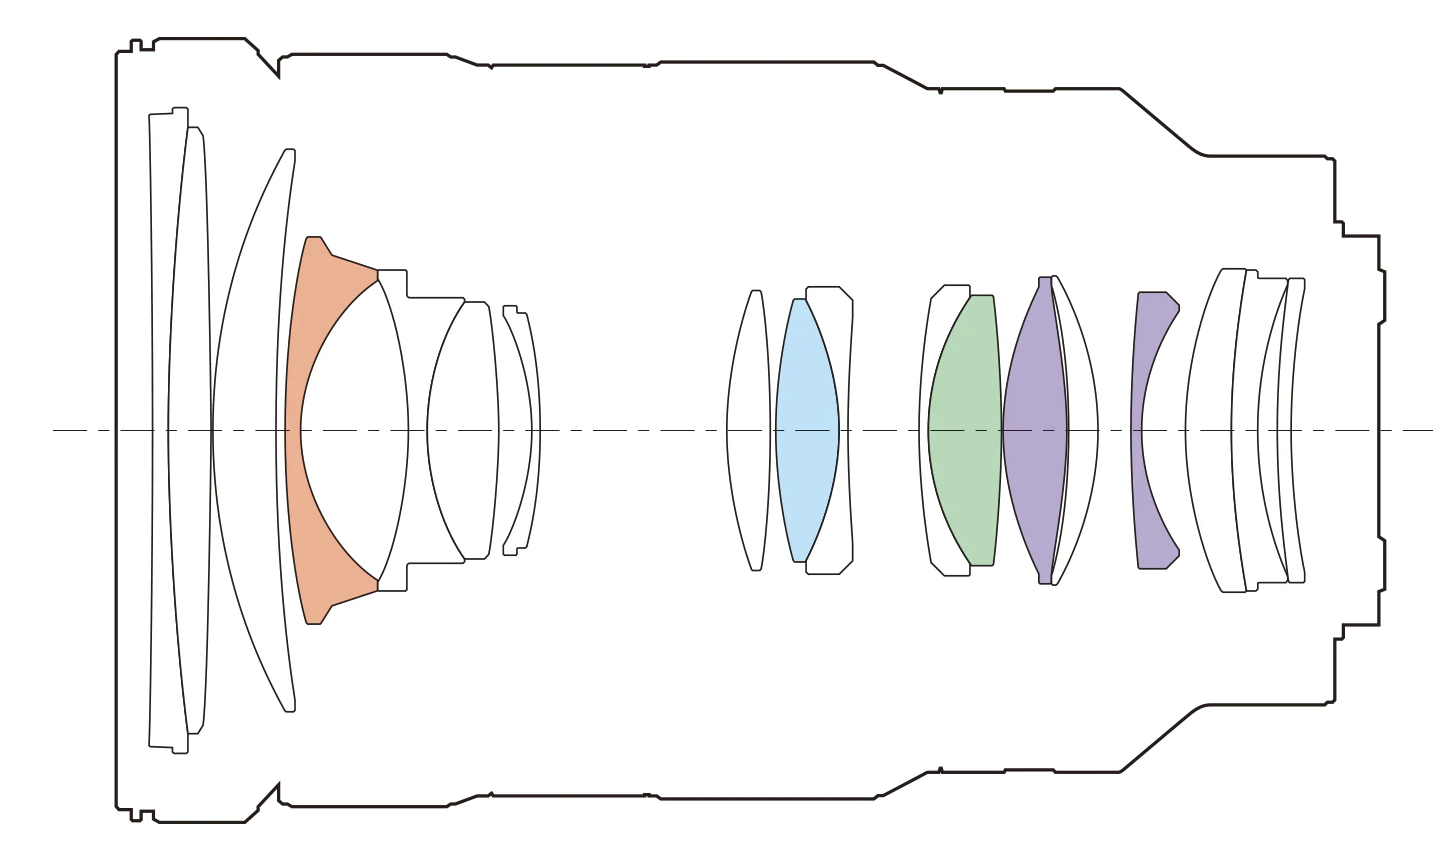
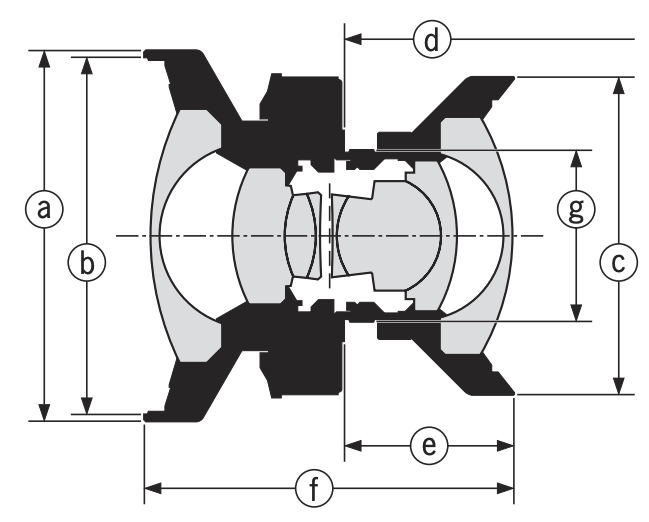
On the other hand, lenses built for view cameras are ludicrously simple. Rarely containing more than ten elements or containing apertures wider than f/4, these lenses are straightforward to design, and the few companies that manufacture them (primarily Schneider and Rodenstock) can focus on spending extra time on R&D, making small batches of lenses using quality materials and coatings, and maintaining tight tolerances in fabrication and assembly. In contrast to the lens above, take a look at the diagram of a Rodenstock Apo-Sironar below:
Moreover, none of those elements ever move. To focus a view camera, all you have to do is move the lens closer to or further from the imaging plane. That’s it. The amount of extension you need is determined by the focal length of your lens and distance to subject, and it’s simple enough to confirm focus by using a loupe on ground glass or live-view with Focus Peaking on a modern digital back like the Phase One IQ4 150MP.
DLSR and mirrorless lenses are much more complicated from an engineering standpoint, though the ease of autofocus can obscure this fact.
The maximum amount of movement allowed by lenses built into barrels is often just a few inches, so for long lenses, which would typically need to be moved great distances to focus near and far, this necessitates workaround lens designs.
On the other end of the spectrum, wide angle lenses may need smaller distances between their rear elements and the image plane than the mechanics of the camera mount allows, requiring other kinds of lens design workarounds.
Sometimes this means all of the elements of the lens moves in one direction within a barrel, other times it means just a few elements shift while the rest remain stationary, and in more complex lenses, can even mean multiple lens groups shift in different directions all at once. Each of these workarounds requires tradeoffs in one aspect or another — sharpness, distortion, light falloff, size and weight — that simple, bellows-focused lenses avoid.
Don’t get me wrong — DSLR and mirrorless lenses use these convoluted optical designs to achieve incredible feats. Lenses with enormously wide apertures, zoom capabilities, and features like image stabilization and autofocus simply aren’t possible to design for a view camera system. But in a landscape or architecture scenario where a photographer can prepare in advance and precision is the only thing that matters, view camera lenses are perfect.
A last interesting note here though – because view cameras are modular and don’t have mirror boxes, they can often be adapted to take any lens made by any manufacturer, similar to most mirrorless cameras. With the right lens board and a medium format digital back, you can use virtually any lens from any manufacturer on a view camera system digitally, with a full suite of movements! Canon TS-E Lens on a view camera? Check! And now we can move in any direction, on multiple axes all at once!
3) Less wide-angle distortion
Before we start talking about distortion on wide angle lenses, we need to talk about what wide angle lenses are.
Wide angle lenses are lenses that provide a wide angular field of view (FOV) in a particular camera configuration.
They are NOT defined by a certain focal length range. Take a look at our Lens Visualizer tools, designed by DT’s Head of R&D, Doug Peterson:
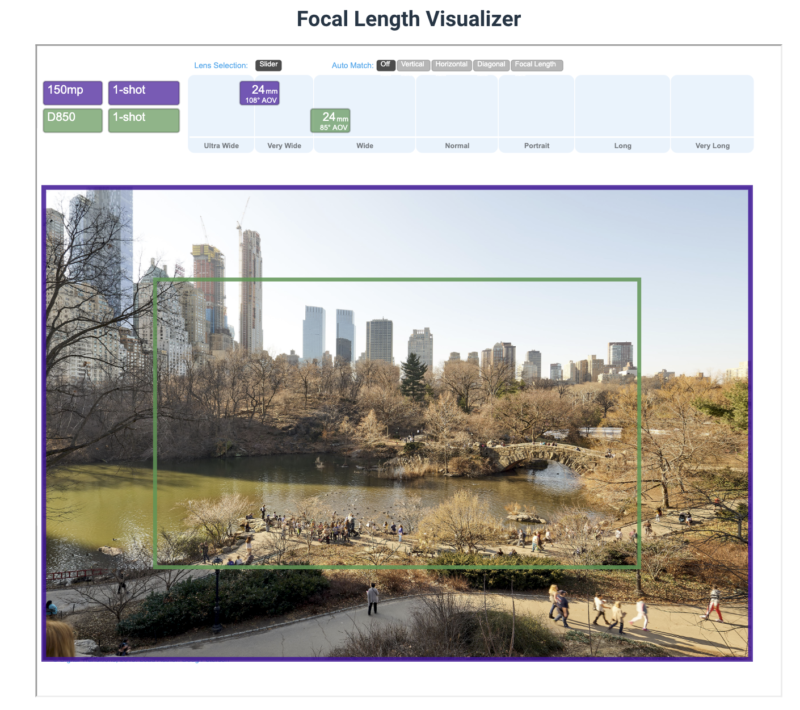
A 24mm lens, for instance, might sound wide without any additional context, and on a 35mm system, it would be. But it would be even wider when used on a full frame 645 sensor like the Phase One IQ4 150MP, and while not shown, placed on a small iPhone sensor, it would actually provide quite a narrow field of view. This is because FOV is determined by two factors — focal length and sensor size.
When comparing lenses on different sized sensors, the concept of “crop factors” often comes up. While “crop factor” isn’t a great term for explaining why this concept works out, it does provide an intuitive rule of thumb for what to expect FOV-wise between lenses of the same focal length on different systems.
Perhaps the most common crop factor 35mm shooters know is that when using a lens on a smaller APS-C system, they will experience a narrower FOV, similar to that provided by a longer focal length, roughly numerically equivalent to the focal length of the lens on their 35mm sensor multiplied by a factor of 1.5x.
The same applies to larger sensors, but in reverse — when moving to a larger sensor size, lenses of the same focal length will provide wider FOVs than they would on a 35mm system, not narrower ones.
Keeping that in mind, we also need to understand what focal length means independent of the sensor used. Consider a 100mm prime lens for example. All photographic lenses, with few exceptions, must be able to focus to infinity, and in mathematical terms, a simple, single-element 100mm lens focuses an object located at infinity when it is 100mm away from the imaging plane. This leaves a reasonable amount of distance behind the lens for mounts, mirrors, stops, shutters, or other elements, meaning that most 100mm lenses can be designed without complex workaround designs and will have relatively little distortion.
However, to do the same thing with a 24mm lens, the lens would have to be 24mm from the image plane to focus at infinity. This presents a problem in SLR systems, as the minimum distance the lens can be from the image plane is limited by the mirror box — 44mm for the Canon EF mount, and 46.5mm for the Nikon F mount. Fortunately, lenses can be designed with what is called a retrofocus configuration, allowing infinity focus even with rear focal distances greater than the lens focal length.
As with all complex lens designs though, this comes with trade-offs, most significantly in the form of more-difficult-to-correct distortion profiles. This effect gets worse as we move to wider and wider lenses, increasing the difference between focal length and rear focal distance. While mirrorless cameras can theoretically circumvent this issue, the most common 35mm mount, the Sony E mount, has a flange distance of 18mm, so ultra-wide options like 14mm and 16-35mm lenses are still forced into retrofocus designs (and the latter of those, as a zoom lens, will exhibit an even more complex distortion profile just by merit of being a zoom lens). Additionally, adapting any SLR lenses like the ever-popular 17mm Canon TS-E or Nikon 14-24mm requires an adapter to make up for the additional required flange distance, relinquishing whatever advantage using a mirrorless system with a smaller flange distance would provide.
We can avoid this effect when using a larger sensor. To achieve an equivalent 85º FOV provided by a 24mm lens on 35mm systems, we can use a 40mm lens on a true medium format digital back like the IQ4 150MP or a 75mm lens on a 4×5 film system. Because digital and film backs no hard limits on “flange distances” when used with the bellows of a view camera, we can get away without having to use retrofocus designs in virtually any circumstance!
On top of it all, we can combine using longer lenses with the movements we discussed above to include more of our scene in any direction, effectively expanding our field of view through stitching.
You can explore this more visually using our lens visualizer tool here: https://dtcommercialphoto.com/support/lens-visualizer-tools/.
4) Modularity – film formats, lens boards, roll film adapters, DB adapters
Modularity is one of the most fun aspects of using a view camera. We already discussed how virtually any lens can be adapted for use with a view camera, but there are many other components that can be mixed and matched. On the imaging plane, a DSLR or mirrorless camera gives you one option:
- Whatever sensor is built in
On the other hand, a view camera gives you a plethora of options. With the right adapters, you can use:
- Some 35mm systems
- 44×33 crop sensor medium format digital backs or mirrorless cameras
- Full-frame 645 medium format digital backs
And depending on the type of view camera you have, you may also be able to use:
- 120/220 roll film
- 4×5 film
- 5×7 film
- 8×10 film
- 16×20 film
- Glass or tin plates
Don’t like the meter on your camera? Not a problem, use any kind you like! Diopter in your tiny viewfinder not strong enough? Use live view on a roomy medium format digital back, or a higher magnification loupe on ground glass!
In the film era, this flexibility came at the cost of a lack of automation — no autofocus, metering, or bracketing built in — but the ability to build your own perfect camera system from scratch was a unique advantage that cannot be ignored.
Nowadays, some of those caveats are even being alleviated. With true medium-format digital backs like the IQ4, bracketing is possible, as is automated metering, live view, and virtual leveling.
5) A Different Workflow Can Inspire Your Creative Process
It may seem clichéd, but adopting a slower, more thoughtful workflow can greatly improve your image making, if you are willing to work at it. When I shoot with a view camera, I question myself at every step.
- What is it about this scene I’m trying to capture?
- Why am I placing myself at this spot in the scene?
- Why did I choose to put my camera at the height it’s at? Convenience? Or is it a meaningful part of my composition?
- How does my foreground relate to my background? How much of each do I want to include in my image?
- How am I oriented in relation to the ground and my subject? Where is my horizon?
- How much depth of field do I need? Do I want my whole image in focus, or am I aiming to isolate a particular feature?
- How do I want to expose my scene? Where are my highlights, if I’m shooting digital or slide film? Where are my shadows, if I’m shooting negatives?
- How much do I need to move my image plane to capture the part of my image circle I want?
The list goes on and on!
On 35mm systems it can be tempting and easy to capture hundreds of images quickly. But on a view camera, a more intentional, deliberate image composition and capture workflow almost invariably leads to new ideas and a higher percentage of quality images.
Summary
In short, there are numerous compelling reasons to use view cameras. While versatility is a valuable quality in a camera, precision, purpose built tools are indispensable for serious landscape and architecture work. While older and more manual in function, the advent of digital backs and technical cameras has streamlined view camera workflow, making them far more accessible to modern photographers.
Want to learn more about how view cameras can add tools to your photographic arsenal? Contact us for more about all things view cameras, old and new, and stay tuned for more articles on technical cameras and workflows!